Tony Lukasavage

Caffeine. Whiskey. Code. Mostly the last one.

Away3d People, Places, and Tutorials

2 things brought about this post:

  1. The increased popularity of Away3D with the announcement of “Molehill” at AdobeMax 2010.
  2. The scarcity and disarray of some of Away3D’s greatest resources for learning and inspiration.

To fix this I am going to create a collection here of the best available blogs, links, tutorials, demos, and videos from the Away3D community. With a little help from you, the visitors to this blog, of course. So PLEASE, if I miss a team member or a good blog, leave a comment and I’ll add it to the list. OK, here we go.

The twitter list

http://twitter.com/#!/tonylukasavage/away3d

Let me know if you want to be added.

The Project

  • Away3D.com - The official Away3D Flash Engine site
  • Away3D tutorials - A list of useful, though slightly dated, tutorials for the engine
  • Away3D Developers Google Group - A growing community where Away3D developers and newbies can interact and ask questions, often addressed by the core team members themselves.

The Team

The blogs, devs, and links

The books

The games, videos, and extras

This list is far from exhaustive and I would love it if my readers would contribute. Let me hear what your other Away3D resources are. I’m all ears.

Adobe “Molehill” 3D API Videos

In the wake of the Adobe Flash “Molehill” 3D API being unveiled at AdobeMax this year, interest in 3D Flash has exploded. Rather than bore you with why I think this is so interesting (though I must mention that it uses the GPU), here’s some videos to give you an idea of how incredible this API is going to be:

Yes, I know, it IS awesome. But be patient kids, the word is a painfully vague “mid 2011” beta release. In the meantime, though, start sharpening with your 3D Flash engine of choice because Adobe has already stated that its going to let the community build the engines. And believe me, Away3D, Alternativa, and a handful of others will be waiting with their Molehill-ready engines as soon as it is released.

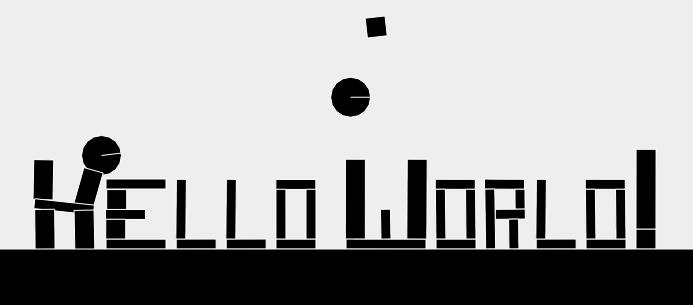
Box2D JS - Physics in HTML5 & Javascript Guide

I hate to do it, but I highly recommend the Google Chrome browser for this demo. In other browsers it may take a while to load and runs slower.

→ Click on the demo above or here, then right click to view source → Download the Box2D JS library → Download the concatenated version (~350KB) → Download the minified version (~170 KB)

The Overview

Some of you might remember the Box2DFlashAS3 demo I did a while ago. Well here’s its HTML5 counter-part, with the help of Box2D JS. Box2D is the Javascript port of the Box2DFlashAS3 library, which in turn is a port of the Box2D C++ library. Put simply, this library allows you to apply 2 dimensional physics to objects on your HTML5 canvas element. Just click anywhere on the demo above to see what I mean.

The code behind this is a condensed, easier-to-follow version of the demo code available by viewing the page source at the Box2D JS site. I personally found it a little tough to follow initially and really wanted to avoid the large amount of individual includes necessary to get it working. To that end I created the concatenated and minified versions downloadable above. So basically the includes necessary go from this:

1
2
3
4
5
6
7
8
9
10
11
12
13
14
15
16
17
18
19
20
21
22
23
24
25
26
27
28
29
30
31
32
33
34
35
36
37
38
39
40
41
42
43
44
45
46
47
48
49
50
51
52
53
54
55
56
57
58
59
60
61
62
63
64
65
66
67
68
<!--[if IE]><script type="text/javascript" src="lib/excanvas.js"></script><![endif]-->
<script src="lib/prototype-1.6.0.2.js"></script>

<!-- box2djs -->
<script src='js/box2d/common/b2Settings.js'></script>
<script src='js/box2d/common/math/b2Vec2.js'></script>
<script src='js/box2d/common/math/b2Mat22.js'></script>
<script src='js/box2d/common/math/b2Math.js'></script>
<script src='js/box2d/collision/b2AABB.js'></script>
<script src='js/box2d/collision/b2Bound.js'></script>
<script src='js/box2d/collision/b2BoundValues.js'></script>
<script src='js/box2d/collision/b2Pair.js'></script>
<script src='js/box2d/collision/b2PairCallback.js'></script>
<script src='js/box2d/collision/b2BufferedPair.js'></script>
<script src='js/box2d/collision/b2PairManager.js'></script>
<script src='js/box2d/collision/b2BroadPhase.js'></script>
<script src='js/box2d/collision/b2Collision.js'></script>
<script src='js/box2d/collision/Features.js'></script>
<script src='js/box2d/collision/b2ContactID.js'></script>
<script src='js/box2d/collision/b2ContactPoint.js'></script>
<script src='js/box2d/collision/b2Distance.js'></script>
<script src='js/box2d/collision/b2Manifold.js'></script>
<script src='js/box2d/collision/b2OBB.js'></script>
<script src='js/box2d/collision/b2Proxy.js'></script>
<script src='js/box2d/collision/ClipVertex.js'></script>
<script src='js/box2d/collision/shapes/b2Shape.js'></script>
<script src='js/box2d/collision/shapes/b2ShapeDef.js'></script>
<script src='js/box2d/collision/shapes/b2BoxDef.js'></script>
<script src='js/box2d/collision/shapes/b2CircleDef.js'></script>
<script src='js/box2d/collision/shapes/b2CircleShape.js'></script>
<script src='js/box2d/collision/shapes/b2MassData.js'></script>
<script src='js/box2d/collision/shapes/b2PolyDef.js'></script>
<script src='js/box2d/collision/shapes/b2PolyShape.js'></script>
<script src='js/box2d/dynamics/b2Body.js'></script>
<script src='js/box2d/dynamics/b2BodyDef.js'></script>
<script src='js/box2d/dynamics/b2CollisionFilter.js'></script>
<script src='js/box2d/dynamics/b2Island.js'></script>
<script src='js/box2d/dynamics/b2TimeStep.js'></script>
<script src='js/box2d/dynamics/contacts/b2ContactNode.js'></script>
<script src='js/box2d/dynamics/contacts/b2Contact.js'></script>
<script src='js/box2d/dynamics/contacts/b2ContactConstraint.js'></script>
<script src='js/box2d/dynamics/contacts/b2ContactConstraintPoint.js'></script>
<script src='js/box2d/dynamics/contacts/b2ContactRegister.js'></script>
<script src='js/box2d/dynamics/contacts/b2ContactSolver.js'></script>
<script src='js/box2d/dynamics/contacts/b2CircleContact.js'></script>
<script src='js/box2d/dynamics/contacts/b2Conservative.js'></script>
<script src='js/box2d/dynamics/contacts/b2NullContact.js'></script>
<script src='js/box2d/dynamics/contacts/b2PolyAndCircleContact.js'></script>
<script src='js/box2d/dynamics/contacts/b2PolyContact.js'></script>
<script src='js/box2d/dynamics/b2ContactManager.js'></script>
<script src='js/box2d/dynamics/b2World.js'></script>
<script src='js/box2d/dynamics/b2WorldListener.js'></script>
<script src='js/box2d/dynamics/joints/b2JointNode.js'></script>
<script src='js/box2d/dynamics/joints/b2Joint.js'></script>
<script src='js/box2d/dynamics/joints/b2JointDef.js'></script>
<script src='js/box2d/dynamics/joints/b2DistanceJoint.js'></script>
<script src='js/box2d/dynamics/joints/b2DistanceJointDef.js'></script>
<script src='js/box2d/dynamics/joints/b2Jacobian.js'></script>
<script src='js/box2d/dynamics/joints/b2GearJoint.js'></script>
<script src='js/box2d/dynamics/joints/b2GearJointDef.js'></script>
<script src='js/box2d/dynamics/joints/b2MouseJoint.js'></script>
<script src='js/box2d/dynamics/joints/b2MouseJointDef.js'></script>
<script src='js/box2d/dynamics/joints/b2PrismaticJoint.js'></script>
<script src='js/box2d/dynamics/joints/b2PrismaticJointDef.js'></script>
<script src='js/box2d/dynamics/joints/b2PulleyJoint.js'></script>
<script src='js/box2d/dynamics/joints/b2PulleyJointDef.js'></script>
<script src='js/box2d/dynamics/joints/b2RevoluteJoint.js'></script>
<script src='js/box2d/dynamics/joints/b2RevoluteJointDef.js'></script>

to this:

1
2
3
<!--[if IE]><script type="text/javascript" src="lib/excanvas.js"></script><![endif]-->
<script src="lib/prototype-1.6.0.2.js"></script>
<script src="box2djs.min.js"></script>

You still need to download Box2D JS for its dependencies on Prototype and excanvas, but using my single file versions of the library will make getting started much cleaner and easier. OK, enough of the back story, on to the code.

The Code

1
2
3
4
5
6
7
8
9
10
11
12
13
14
15
16
17
18
19
20
21
22
23
24
25
26
27
28
29
30
31
32
33
34
35
36
37
38
39
40
41
42
43
44
45
46
47
48
49
50
51
52
53
54
55
56
57
58
59
60
61
62
63
64
65
66
67
68
69
70
71
72
73
74
75
76
77
78
79
80
81
82
83
84
85
86
87
88
89
90
91
92
93
94
95
96
97
98
99
100
101
102
103
104
105
106
107
108
109
110
111
112
113
114
115
116
117
118
119
120
121
122
123
124
125
126
127
128
129
130
131
132
133
134
135
136
137
138
139
140
141
142
143
144
145
146
147
148
149
150
151
152
153
154
155
156
157
158
159
160
161
162
163
164
165
166
167
168
169
170
171
172
173
174
175
176
177
178
179
180
181
182
183
184
185
186
187
188
189
190
191
192
193
194
195
196
197
198
199
200
201
202
203
204
205
206
207
208
209
210
211
212
213
214
215
216
217
218
219
220
221
222
223
224
225
226
227
228
229
230
231
232
233
234
235
236
237
238
239
240
241
242
243
244
245
246
247
248
249
250
251
252
253
254
255
256
257
258
259
260
261
262
263
264
265
266
267
268
269
270
271
272
273
274
<!DOCTYPE html PUBLIC "-//W3C//DTD XHTML 1.0 Transitional//EN" "http://www.w3.org/TR/xhtml1/DTD/xhtml1-transitional.dtd">
<html xmlns="http://www.w3.org/1999/xhtml">
    <head>
  <meta http-equiv="Content-Type" content="text/html; charset=utf-8" />
  <title>SavageLook.com - Box2D JS Hello World</title>
  <!--[if IE]><script type="text/javascript" src="lib/excanvas.js"></script><![endif]-->
  <script src="lib/prototype-1.6.0.2.js"></script>
  <script src="box2djs.min.js"></script>

  <script type="text/javascript">
  var world;
  var ctx;
  var canvasWidth;
  var canvasHeight;
  var canvasTop;
  var canvasLeft;

  function drawWorld(world, context) {
      for (var j = world.m_jointList; j; j = j.m_next) {
          drawJoint(j, context);
      }
      for (var b = world.m_bodyList; b; b = b.m_next) {
          for (var s = b.GetShapeList(); s != null; s = s.GetNext()) {
              drawShape(s, context);
          }
      }

      ctx.font = 'bold 18px arial';
      ctx.textAlign = 'center';
      ctx.fillStyle = '#000000';
      ctx.fillText("Click the screen to add more objects", 400, 20);
      ctx.font = 'bold 14px arial';
      ctx.fillText("Performance will vary by browser", 400, 40);

  }

  function drawJoint(joint, context) {
      var b1 = joint.m_body1;
      var b2 = joint.m_body2;
      var x1 = b1.m_position;
      var x2 = b2.m_position;
      var p1 = joint.GetAnchor1();
      var p2 = joint.GetAnchor2();
      context.strokeStyle = '#00eeee';
      context.beginPath();
      switch (joint.m_type) {
      case b2Joint.e_distanceJoint:
          context.moveTo(p1.x, p1.y);
          context.lineTo(p2.x, p2.y);
          break;

      case b2Joint.e_pulleyJoint:
          // TODO
          break;

      default:
          if (b1 == world.m_groundBody) {
              context.moveTo(p1.x, p1.y);
              context.lineTo(x2.x, x2.y);
          }
          else if (b2 == world.m_groundBody) {
              context.moveTo(p1.x, p1.y);
              context.lineTo(x1.x, x1.y);
          }
          else {
              context.moveTo(x1.x, x1.y);
              context.lineTo(p1.x, p1.y);
              context.lineTo(x2.x, x2.y);
              context.lineTo(p2.x, p2.y);
          }
          break;
      }
      context.stroke();
  }

  function drawShape(shape, context) {
      context.strokeStyle = '#ffffff';
      if (shape.density == 1.0) {
          context.fillStyle = "red";
      } else {
          context.fillStyle = "black";
      }
      context.beginPath();
      switch (shape.m_type) {
      case b2Shape.e_circleShape:
          {
              var circle = shape;
              var pos = circle.m_position;
              var r = circle.m_radius;
              var segments = 16.0;
              var theta = 0.0;
              var dtheta = 2.0 * Math.PI / segments;

              // draw circle
              context.moveTo(pos.x + r, pos.y);
              for (var i = 0; i < segments; i++) {
                  var d = new b2Vec2(r * Math.cos(theta), r * Math.sin(theta));
                  var v = b2Math.AddVV(pos, d);
                  context.lineTo(v.x, v.y);
                  theta += dtheta;
              }
              context.lineTo(pos.x + r, pos.y);

              // draw radius
              context.moveTo(pos.x, pos.y);
              var ax = circle.m_R.col1;
              var pos2 = new b2Vec2(pos.x + r * ax.x, pos.y + r * ax.y);
              context.lineTo(pos2.x, pos2.y);
          }
          break;
      case b2Shape.e_polyShape:
          {
              var poly = shape;
              var tV = b2Math.AddVV(poly.m_position, b2Math.b2MulMV(poly.m_R, poly.m_vertices[0]));
              context.moveTo(tV.x, tV.y);
              for (var i = 0; i < poly.m_vertexCount; i++) {
                  var v = b2Math.AddVV(poly.m_position, b2Math.b2MulMV(poly.m_R, poly.m_vertices[i]));
                  context.lineTo(v.x, v.y);
              }
              context.lineTo(tV.x, tV.y);
          }
          break;
      }
      context.fill();
      context.stroke();
  }

  function createWorld() {
      var worldAABB = new b2AABB();
      worldAABB.minVertex.Set(-1000, -1000);
      worldAABB.maxVertex.Set(1000, 1000);
      var gravity = new b2Vec2(0, 300);
      var doSleep = true;
      world = new b2World(worldAABB, gravity, doSleep);
      createGround(world);
      return world;
  }

  function createGround(world) {
      var groundSd = new b2BoxDef();
      groundSd.extents.Set(400, 30);
      groundSd.restitution = 0.0;
      var groundBd = new b2BodyDef();
      groundBd.AddShape(groundSd);
      groundBd.position.Set(400, 470);
      return world.CreateBody(groundBd);
  }

  function createBall(world, x, y) {
      var ballSd = new b2CircleDef();
      ballSd.density = 1.0;
      ballSd.radius = 20;
      ballSd.restitution = 0.5;
      ballSd.friction = 0.5;
      var ballBd = new b2BodyDef();
      ballBd.AddShape(ballSd);
      ballBd.position.Set(x,y);
      return world.CreateBody(ballBd);
  }

  function createHelloWorld() {
      // H
      createBox(world, 50, 420, 10, 20, false);
      createBox(world, 90, 420, 10, 20, false);
      createBox(world, 70, 395, 30, 5, false);
      createBox(world, 50, 370, 10, 20, false);
      createBox(world, 90, 370, 10, 20, false);

      // E
      createBox(world, 140, 435, 30, 5, false);
      createBox(world, 120, 420, 10, 10, false);
      createBox(world, 130, 405, 20, 5, false);
      createBox(world, 120, 390, 10, 10, false);
      createBox(world, 140, 375, 30, 5, true);

      // L
      createBox(world, 200, 435, 20, 5, false);
      createBox(world, 185, 400, 5, 30, false);

      // L
      createBox(world, 250, 435, 20, 5, false);
      createBox(world, 235, 400, 5, 30, false);

      // O
      createBox(world, 300, 435, 20, 5, false);
      createBox(world, 285, 405, 5, 25, false);
      createBox(world, 315, 405, 5, 25, false);
      createBox(world, 300, 375, 20, 5, false);

      // W
      createBox(world, 390, 435, 40, 5, false);
      createBox(world, 360, 390, 10, 40, false);
      createBox(world, 420, 390, 10, 40, false);
      createBox(world, 390, 415, 5, 15, false);

      // O
      createBox(world, 460, 435, 20, 5, false);
      createBox(world, 445, 405, 5, 25, false);
      createBox(world, 475, 405, 5, 25, false);
      createBox(world, 460, 375, 20, 5, false);

      // R
      createBox(world, 495, 410, 5, 30, false);
      createBox(world, 518, 425, 5, 15, false);
      createBox(world, 515, 405, 15, 5, false);
      createBox(world, 525, 390, 5, 10, false);
      createBox(world, 510, 375, 20, 5, false);

      // L
      createBox(world, 560, 435, 20, 5, false);
      createBox(world, 545, 400, 5, 30, false);

      // D
      createBox(world, 610, 435, 20, 5, false);
      createBox(world, 595, 405, 5, 25, false);
      createBox(world, 625, 405, 5, 25, false);
      createBox(world, 610, 375, 20, 5, false);

      // !
      createBox(world, 650, 430, 10, 10, false);
      createBox(world, 650, 380, 10, 40, false);
  }

  function createBox(world, x, y, width, height, fixed) {
      if (typeof(fixed) == 'undefined') fixed = true;
      var boxSd = new b2BoxDef();
      if (!fixed) boxSd.density = 1.0;
      boxSd.restitution = 0.0;
      boxSd.friction = 1.0;
      boxSd.extents.Set(width, height);
      var boxBd = new b2BodyDef();
      boxBd.AddShape(boxSd);
      boxBd.position.Set(x,y);
      return world.CreateBody(boxBd);
  }

  function step(cnt) {
      var stepping = false;
      var timeStep = 1.0/60;
      var iteration = 1;
      world.Step(timeStep, iteration);
      ctx.clearRect(0, 0, canvasWidth, canvasHeight);
      drawWorld(world, ctx);
      setTimeout('step(' + (cnt || 0) + ')', 10);
  }

  // main entry point
  Event.observe(window, 'load', function() {
      world = createWorld();
      ctx = $('canvas').getContext('2d');
      var canvasElm = $('canvas');
      canvasWidth = parseInt(canvasElm.width);
      canvasHeight = parseInt(canvasElm.height);
      canvasTop = parseInt(canvasElm.style.top);
      canvasLeft = parseInt(canvasElm.style.left);

      createHelloWorld();

      Event.observe('canvas', 'click', function(e) {
              if (Math.random() > 0.5) {
                  //createBox(world, Event.pointerX(e), Event.pointerY(e), 10, 10, false);
                  createBox(world, e.clientX, e.clientY, 10, 10, false);
              } else {
                  createBall(world, Event.pointerX(e), Event.pointerY(e));
              }
      });
      step();
  });
  </script>
    </head>
    <body style="margin:0px;">
        <canvas id="canvas" width='800' height='500' style="background-color:#eeeeee;"></canvas>
    </body>
 </html>

The Breakdown

1
2
3
4
5
6
7
8
<!DOCTYPE html PUBLIC "-//W3C//DTD XHTML 1.0 Transitional//EN" "http://www.w3.org/TR/xhtml1/DTD/xhtml1-transitional.dtd">
<html xmlns="http://www.w3.org/1999/xhtml">
    <head>
  <meta http-equiv="Content-Type" content="text/html; charset=utf-8" />
  <title>SavageLook.com - Box2D JS Hello World</title>
  <!--[if IE]><script type="text/javascript" src="lib/excanvas.js"></script><![endif]-->
  <script src="lib/prototype-1.6.0.2.js"></script>
  <script src="box2djs.min.js"></script>

We start by including the scripts necessary to make Box2D JS work. In order, we need excanvas (included in the Box2D JS distribution) in order to account for the fact that all current released version of Internet Explorer do not support the HTML canvas element. Next we include the Prototype Javascript framework, also included with Box2D JS. Finally we include my minified version of the library. Now we can get started building physics into our canvas element.


1
2
3
4
5
6
7
8
9
10
11
12
13
14
15
16
17
18
19
20
21
22
23
24
25
26
<script type="text/javascript">
  var world;
  var ctx;
  var canvasWidth;
  var canvasHeight;
  var canvasTop;
  var canvasLeft;

  function drawWorld(world, context) {
      for (var j = world.m_jointList; j; j = j.m_next) {
          drawJoint(j, context);
      }
      for (var b = world.m_bodyList; b; b = b.m_next) {
          for (var s = b.GetShapeList(); s != null; s = s.GetNext()) {
              drawShape(s, context);
          }
      }

      ctx.font = 'bold 18px arial';
      ctx.textAlign = 'center';
      ctx.fillStyle = '#000000';
      ctx.fillText("Click the screen to add more objects", 400, 20);
      ctx.font = 'bold 14px arial';
      ctx.fillText("Performance will vary by browser", 400, 40);

  }

Here we declare our global variables that define the “world” the physics exist in and the context, dimensions, and position of the canvas element.

Also we have our drawWorld() function that will, as the name implies, draw the shapes and joints that compose the Box2D JS world. Each of these objects is iterated through and drawn individually. They are added to the world with the createBody() function. An important thing to note is that in the case of this demo, drawWorld() will be called with each “step”. Think of your canvas as an animation and each call to drawWorld() as a frame. Should be a simple concept for you Flash devs out there ;)


1
2
3
4
5
6
7
8
9
10
11
12
13
14
15
16
17
18
19
20
21
22
23
24
25
26
27
28
29
30
31
32
33
34
35
36
37
38
39
40
41
42
43
44
45
46
47
48
49
50
51
52
53
54
55
56
57
58
59
60
61
62
63
64
65
66
67
68
69
70
71
72
73
74
75
76
77
78
79
80
81
82
83
84
85
86
87
88
89
90
function drawJoint(joint, context) {
  var b1 = joint.m_body1;
  var b2 = joint.m_body2;
  var x1 = b1.m_position;
  var x2 = b2.m_position;
  var p1 = joint.GetAnchor1();
  var p2 = joint.GetAnchor2();
  context.strokeStyle = '#00eeee';
  context.beginPath();
  switch (joint.m_type) {
  case b2Joint.e_distanceJoint:
      context.moveTo(p1.x, p1.y);
      context.lineTo(p2.x, p2.y);
      break;

  case b2Joint.e_pulleyJoint:
      // TODO
      break;

  default:
      if (b1 == world.m_groundBody) {
          context.moveTo(p1.x, p1.y);
          context.lineTo(x2.x, x2.y);
      }
      else if (b2 == world.m_groundBody) {
          context.moveTo(p1.x, p1.y);
          context.lineTo(x1.x, x1.y);
      }
      else {
          context.moveTo(x1.x, x1.y);
          context.lineTo(p1.x, p1.y);
          context.lineTo(x2.x, x2.y);
          context.lineTo(p2.x, p2.y);
      }
      break;
  }
  context.stroke();
}

function drawShape(shape, context) {
  context.strokeStyle = '#ffffff';
  if (shape.density == 1.0) {
      context.fillStyle = "red";
  } else {
      context.fillStyle = "black";
  }
  context.beginPath();
  switch (shape.m_type) {
  case b2Shape.e_circleShape:
      {
          var circle = shape;
          var pos = circle.m_position;
          var r = circle.m_radius;
          var segments = 16.0;
          var theta = 0.0;
          var dtheta = 2.0 * Math.PI / segments;

          // draw circle
          context.moveTo(pos.x + r, pos.y);
          for (var i = 0; i < segments; i++) {
              var d = new b2Vec2(r * Math.cos(theta), r * Math.sin(theta));
              var v = b2Math.AddVV(pos, d);
              context.lineTo(v.x, v.y);
              theta += dtheta;
          }
          context.lineTo(pos.x + r, pos.y);

          // draw radius
          context.moveTo(pos.x, pos.y);
          var ax = circle.m_R.col1;
          var pos2 = new b2Vec2(pos.x + r * ax.x, pos.y + r * ax.y);
          context.lineTo(pos2.x, pos2.y);
      }
      break;
  case b2Shape.e_polyShape:
      {
          var poly = shape;
          var tV = b2Math.AddVV(poly.m_position, b2Math.b2MulMV(poly.m_R, poly.m_vertices[0]));
          context.moveTo(tV.x, tV.y);
          for (var i = 0; i < poly.m_vertexCount; i++) {
              var v = b2Math.AddVV(poly.m_position, b2Math.b2MulMV(poly.m_R, poly.m_vertices[i]));
              context.lineTo(v.x, v.y);
          }
          context.lineTo(tV.x, tV.y);
      }
      break;
  }
  context.fill();
  context.stroke();
}

Above are the body drawing functions: drawJoint() and drawShape(). I’m not going to get into much detail here, but just know that these functions are responsible for taking the physics bodies and giving them a visual representation. They make calls to the canvas context 2D drawing API to create the shapes that give us our falling rectangles and circles. This is the simplest case and requires no external dependencies. In practical cases though, you will more likely find images or other more clever uses like this one:


1
2
3
4
5
6
7
8
9
10
function createWorld() {
  var worldAABB = new b2AABB();
  worldAABB.minVertex.Set(-1000, -1000);
  worldAABB.maxVertex.Set(1000, 1000);
  var gravity = new b2Vec2(0, 300);
  var doSleep = true;
  world = new b2World(worldAABB, gravity, doSleep);
  createGround(world);
  return world;
}

This is where the Box2D JS physics world is created. We define the bounds for the AABB physics with the minVertex and maxVertex properties and set the vector of gravity. After we create those we apply them to a newly created world and create the ground that will be the base of our scene.


1
2
3
4
5
6
7
8
9
10
11
12
13
14
15
16
17
18
19
20
21
22
23
24
25
26
27
28
29
30
31
32
33
34
function createGround(world) {
  var groundSd = new b2BoxDef();
  groundSd.extents.Set(400, 30);
  groundSd.restitution = 0.0;
  var groundBd = new b2BodyDef();
  groundBd.AddShape(groundSd);
  groundBd.position.Set(400, 470);
  return world.CreateBody(groundBd);
}

function createBall(world, x, y) {
  var ballSd = new b2CircleDef();
  ballSd.density = 1.0;
  ballSd.radius = 20;
  ballSd.restitution = 0.5;
  ballSd.friction = 0.5;
  var ballBd = new b2BodyDef();
  ballBd.AddShape(ballSd);
  ballBd.position.Set(x,y);
  return world.CreateBody(ballBd);
}

    function createBox(world, x, y, width, height, fixed) {
  if (typeof(fixed) == 'undefined') fixed = true;
  var boxSd = new b2BoxDef();
  if (!fixed) boxSd.density = 1.0;
  boxSd.restitution = 0.0;
  boxSd.friction = 1.0;
  boxSd.extents.Set(width, height);
  var boxBd = new b2BodyDef();
  boxBd.AddShape(boxSd);
  boxBd.position.Set(x,y);
  return world.CreateBody(boxBd);
}

Above we have the body create functions: createGround(), createBall(), and createBox(). Other than the obvious, let’s talk about a few things going on here. Each body is defined by a shape definition, and each shape definition has a number of properties that dictate how it will behave in the Box2D JS world (see the Box2D docs for details). Restitution, friction, and density affect how the shapes fall, move, and react.

The extents define the dimensions of the shapes, but probably not how you are accustomed. Extents represent the distance from one corner of the shape to its center. So a 100x100 box is actually defined by the extents shapeDef.extents.Set(50,50).

The shape definition is then used to define a body definition. The body is then positioned in the world. The positioning, like extents, is also based on the center of the body, not its corner. Finally, the newly defined body, based on the shape definition, is added the world with the CreateBody() function.


1
2
3
4
5
6
7
8
9
10
11
12
13
14
15
16
17
18
19
20
21
22
23
24
25
26
27
28
29
30
31
32
33
34
35
36
37
38
39
40
41
42
43
44
45
46
47
48
49
50
51
52
53
54
55
56
57
58
59
60
61
62
function createHelloWorld() {
  // H
  createBox(world, 50, 420, 10, 20, false);
  createBox(world, 90, 420, 10, 20, false);
  createBox(world, 70, 395, 30, 5, false);
  createBox(world, 50, 370, 10, 20, false);
  createBox(world, 90, 370, 10, 20, false);

  // E
  createBox(world, 140, 435, 30, 5, false);
  createBox(world, 120, 420, 10, 10, false);
  createBox(world, 130, 405, 20, 5, false);
  createBox(world, 120, 390, 10, 10, false);
  createBox(world, 140, 375, 30, 5, true);

  // L
  createBox(world, 200, 435, 20, 5, false);
  createBox(world, 185, 400, 5, 30, false);

  // L
  createBox(world, 250, 435, 20, 5, false);
  createBox(world, 235, 400, 5, 30, false);

  // O
  createBox(world, 300, 435, 20, 5, false);
  createBox(world, 285, 405, 5, 25, false);
  createBox(world, 315, 405, 5, 25, false);
  createBox(world, 300, 375, 20, 5, false);

  // W
  createBox(world, 390, 435, 40, 5, false);
  createBox(world, 360, 390, 10, 40, false);
  createBox(world, 420, 390, 10, 40, false);
  createBox(world, 390, 415, 5, 15, false);

  // O
  createBox(world, 460, 435, 20, 5, false);
  createBox(world, 445, 405, 5, 25, false);
  createBox(world, 475, 405, 5, 25, false);
  createBox(world, 460, 375, 20, 5, false);

  // R
  createBox(world, 495, 410, 5, 30, false);
  createBox(world, 518, 425, 5, 15, false);
  createBox(world, 515, 405, 15, 5, false);
  createBox(world, 525, 390, 5, 10, false);
  createBox(world, 510, 375, 20, 5, false);

  // L
  createBox(world, 560, 435, 20, 5, false);
  createBox(world, 545, 400, 5, 30, false);

  // D
  createBox(world, 610, 435, 20, 5, false);
  createBox(world, 595, 405, 5, 25, false);
  createBox(world, 625, 405, 5, 25, false);
  createBox(world, 610, 375, 20, 5, false);

  // !
  createBox(world, 650, 430, 10, 10, false);
  createBox(world, 650, 380, 10, 40, false);
}

Here’s my addition to the Box2D JS code. By using a series of stacked boxes I create the infamous programmer’s first message, “Hello World!” (minus the comma, sorry). No science or mystery here, just a lot of extents and positions for the boxes that compose my message. And yes, I did cheat on the “E” and make it fixed, but not even I can defy the laws of physics for the sake of a code demo.


1
2
3
4
5
6
7
8
9
function step(cnt) {
  var stepping = false;
  var timeStep = 1.0/60;
  var iteration = 1;
  world.Step(timeStep, iteration);
  ctx.clearRect(0, 0, canvasWidth, canvasHeight);
  drawWorld(world, ctx);
  setTimeout('step(' + (cnt || 0) + ')', 10);
}

The step() function is the what makes the whole thing work. step() is called over and over, at specified intervals, to create the animation of our scene on the canvas. The world’s Step() function is first called to apply one iteration of physics to our world’s bodies. Next we clear the visual representation of the scene so that it can be redrawn by our drawWorld() function. Finally we set the interval timer so that step() will be called again. Again, Flash devs will recognize this as a similar methodology as using the ENTER_FRAME event.


1
2
3
4
5
6
7
8
9
10
11
12
13
14
15
16
17
18
19
20
21
22
23
// main entry point
Event.observe(window, 'load', function() {
  world = createWorld();
  ctx = $('canvas').getContext('2d');
  var canvasElm = $('canvas');
  canvasWidth = parseInt(canvasElm.width);
  canvasHeight = parseInt(canvasElm.height);
  canvasTop = parseInt(canvasElm.style.top);
  canvasLeft = parseInt(canvasElm.style.left);

  createHelloWorld();

  Event.observe('canvas', 'click', function(e) {
          if (Math.random() > 0.5) {
              //createBox(world, Event.pointerX(e), Event.pointerY(e), 10, 10, false);
              createBox(world, e.clientX, e.clientY, 10, 10, false);
          } else {
              createBall(world, Event.pointerX(e), Event.pointerY(e));
          }
  });
  step();
});
</script>

And this is where we kick everything off. We use the Prototype event handling mechanism to wait until the window is loaded to start our code. We first create the Box2D JS world and get the 2D context, dimensions, and position of our canvas. After that I create the boxes that make up the Hello World message. To finish up we listen for mouse clicks so that we can add more falling objects to the scene, since what good is a meticulously stacked Hello World if you can’t turn it into a pile of rubble? The first step() is kicked off and our scene is ready to go!


1
2
3
4
5
</head>
<body style="margin:0px;">
    <canvas id="canvas" width='800' height='500' style="background-color:#eeeeee;"></canvas>
</body>
 </html>

And to round out the breakdown, here’s the actual instance of the canvas element. Its a very simple container and allows for all the heavy lifting to be done in the Javascript. Just a reminder, the canvas element will NOT work in Internet Explorer unless you have the conditional check that includes excanvas if necessary, or if you happen to be test driving the IE9 beta.

The Summary

OK, well that turned out a lot longer and wordier than I was expecting, but 2D physics being utilized in HTML5 and Javascript is a simple topic. Hopefully, though, if you made it all the way through you have a much better understanding of how they all play together and how you will create Newtonian worlds of your own.

The difference in performance between different browsers is enough to drive you crazy. In my personal experience, Chrome > Firefox > IE. I know its early in the game and that IE 9 and Firefox 4 will likely be right up to par with Chrome, but its this lag and inconsistency across the board that has me spending most of my web development time in Flash and AS3.

Also, I had trouble making this work in all versions of IE, so if you run into any problems with a particular browser, please let me know.

NOTE: The concatenated version of Box2D JS is a convenience I offer so that you don’t have to do all the individual includes shown on the Box2D JS site’s demos. The minified version is that same concatenated version run through JSMin. Both versions are based on version 0.1.0 of Box2D JS. I am not a contributor to the Box2D JS project, just someone making it simpler to get into.

Packet capture with C++ & Linux

As part of a larger project I’m working on I need to refamiliarize myself with some old friends: C and libcap. While I do have a healthy dislike for coding in C, I have a much healthier respect for those who have used it to create some pretty fantastic stuff. It still takes conscious effort to not spend all my time wrapping C code in C++ objects, but I digress.

libpcap is a C library used to capture and analyze network packets off the wire, otherwise known as packet sniffing. Some of the more prominent applications out there using it right now are Snort intrusion detection system, Wireshark network analyzer (formerly known as Ethereal), and the proprietor of libpcap, tcpdump.

Why would you want to be able to analyze packets in code and not use one of these applications? Because packet sniffing, in the hands of someone knowledgeable in network protocols, can be a great, non-intrusive way to gather discrete or statistical information and tie it to other coded business logic. There’s also that little, evil, don-your-black-hat, I-wanna-be-a-hacker kind of feel to seeing packets you have no explicit reason to see. Motives aside, let’s see a simple example of how it works in Linux with a little C++ tacked on.

The Code

1
2
3
4
5
6
7
8
9
10
11
12
13
14
15
16
17
18
19
20
21
22
23
24
25
26
27
28
29
30
31
32
33
34
35
36
37
#include <iostream>
#include <pcap.h>

using namespace std;

static int packetCount = 0;

void packetHandler(u_char *userData, const struct pcap_pkthdr* pkthdr, const u_char* packet) {
  cout << ++packetCount << " packet(s) captured" << endl;
}

int main() {
  char *dev;
  pcap_t *descr;
  char errbuf[PCAP_ERRBUF_SIZE];

  dev = pcap_lookupdev(errbuf);
  if (dev == NULL) {
      cout << "pcap_lookupdev() failed: " << errbuf << endl;
      return 1;
  }

  descr = pcap_open_live(dev, BUFSIZ, 0, -1, errbuf);
  if (descr == NULL) {
      cout << "pcap_open_live() failed: " << errbuf << endl;
      return 1;
  }

  if (pcap_loop(descr, 10, packetHandler, NULL) < 0) {
      cout << "pcap_loop() failed: " << pcap_geterr(descr);
      return 1;
  }

  cout << "capture finished" << endl;

  return 0;
}

The Output

1
2
3
4
5
6
7
8
9
10
11
1 packet(s) captured
2 packet(s) captured
3 packet(s) captured
4 packet(s) captured
5 packet(s) captured
6 packet(s) captured
7 packet(s) captured
8 packet(s) captured
9 packet(s) captured
10 packet(s) captured
capture finished

In this very basic example we are simply setting up a network interface to use libpcap, capturing a few packets, and exiting with a message. Pretty vanilla, but there’s a good bit going on here. let’s break it down in more detail.

The Breakdown

1
2
3
#include <iostream>
#include <pcap.h>
using namespace std;

Here along with standard includes we also include pcap.h. This is the header file that is necessary for all libpcap operations and constants.


1
2
3
4
static int packetCount = 0;
void packetHandler(u_char *userData, const struct pcap_pkthdr* pkthdr, const u_char* packet) {
  cout << ++packetCount << " packet(s) captured" << endl;
}

This is the callback packet handler function that will do all the heavy lifting when it comes to network analysis. This callback is referenced later by the pcap_loop() function. Every packet that pcap receives will be passed to this function. Here’s the explanation of the parameters:

  • userData - a pointer to user defined data that can be passed into each callback, as defined in the pcap_loop() call’s 4th parameter.
  • pkthdr - the pcap packet header that includes relevant information about the packet as it relates to pcap’s capture.
  • packet - a pointer to the actual packet that will be analyzed.

For the sake of this example, we won’t be doing any protocol analysis and will simply be counting the number of packets that pass over our listening interface.


1
2
3
4
int main() {
  char *dev;
  pcap_t *descr;
  char errbuf[PCAP_ERRBUF_SIZE];

The start of our packet capture program.

  • dev - this will hold the name of the interface on which we will sniff
  • descr - The descriptor, or handle, for the libpcap packet capture
  • errbuf - a character buffer to contain any potential errors from libpcap. The max error size is defined by PCAP_ERRBUF_SIZE in pcap.h.


1
2
3
4
5
dev = pcap_lookupdev(errbuf);
if (dev == NULL) {
  cout << "pcap_lookupdev() failed: " << errbuf << endl;
  return 1;
}

Here we use pcap_lookupdev() to find an available network interface on which to sniff. The name of the interface is returned in the dev character array. If there is an error or if no interface is available, pcap_lookupdev() returns a NULL value and fills the errbuf with the relevant error information. Returning a failure value then populating an error buffer is common practice for libpcap functions that end in error.


1
2
3
4
5
descr = pcap_open_live(dev, BUFSIZ, 0, -1, errbuf);
if (descr == NULL) {
  cout << "pcap_open_live() failed: " << errbuf << endl;
  return 1;
}

Next we create our packet capture descriptor using pcap_open_live(). This is how we will enable our target network interface for sniffing. It will return a valid descriptor on success, a NULL on failure. The parameters are as follows:

  • device - the name of the network interface to be used by libpcap for sniffing. We found it using pcap_lookupdev().
  • snaplen - the maximum snap length, or packet size, to be handled by this descriptor. We using the system defined BUFSIZ constant.
  • promisc - Determines whether or not the interface will listen in promiscuous mode. Promiscuous mode will analyze packets not specifically addressed for your machine, like if you were attached to a hub or a mirrored switch port. 1 turns it on, 0 turns it off.
  • to_ms - this is the packet read timeout in milliseconds. Specify -1 for no timeout.
  • errbuf - In case of an error, this is where a descriptive message will be left.

1
2
3
4
5
6
7
8
if (pcap_loop(descr, 10, packetHandler, NULL) < 0) {
  cout << "pcap_loop() failed: " << pcap_geterr(descr);
  return 1;
}
cout << "capture finished" << endl;

return 0;
}

And here’s the call we’ve been waiting for: pcap_loop(). This will take our pcap descriptor and start sniffing packets, sending them all to our packet handler callback function, aptly named packetHandler(). Here’s pcap_loop()’s parameters:

  • descr - the packet capture descriptor that we have initialized in the previous steps.
  • count - the number of packets to capture before pcap_loop() exits. Use -1 or 0 to use no limit.
  • callback - this is the callback function that is called every time pcap sniffs a packet. As specified above in the packetHandler() function, it receives relevant user data, pcap headers, and full packet data. It is the work horse of the packet analysis process. If creating a callback of your own, be sure to follow the function signature given in packetHandler().
  • userData - this is an array of unsigned bytes to be sent in with each packet. You can use it to hold any relevant user data you would like to send to the callback as its first paramater. You can also specify NULL if you wish to pass no user data to the callback.

The Summary

With this basic example you can now use C/C++ to capture network packets. But keeping a count of packets isn’t terribly interesting, is it? No, I don’t think so either. So what should I do next? If you managed to make it all the way to this summary, you can help me decide what aspects of packet capture or C/C++ to show case next. Comment on one of the following or ad your own idea and I’ll probably do it next!

  • Learn how to use Berkeley packet filters to focus and make more efficient your packet sniffing.
  • Process offline packet capture dumps from some of the other programs I mentioned earlier. It’s a critical skill for testing.
  • Use libpcap to learn more about the interfaces on your system?
  • Wrap this ugly C code in some much more developer friendly C++ objects.
  • Get right into the nitty gritty and start learning how to analyze packet data.

The choice is your’s guys.

Setting Up Wireless on Centos 5

Centos isn’t exactly the best Linux desktop distro. Ubuntu, Fedora, or Mint jump to mind as better alternatives. But that’s not Centos’s fault as its core focus is stability. For this reason, Centos is purposely a bit behind the times and only adds proven functionality to its core, as well as its published package repositories.

Unfortunately, though, I need a C++ development environment that will suit a Centos server project I’m working on. Wireless network connectivity was the first hurdle I ran into. No out of the box support for my HP laptop. In fact, when trying to enable the wireless interface on my laptop I got nothing but a very cryptic error message:

[root@localhost ~]# ifup wlan0
Determining IP information for wlan0...SIOCSIFFLAGS: No such file or directory.

Helpful, I know. But with a little bit of research I found the setting up wireless section of the Centos laptop FAQs. In here it states Centos does not come with the required wireless firmware for any laptops that don’t allow its free distribution. This then leaves it up to us, the users, to track it down and install it. Here’s how:

  1. Open up your /etc/sysconfig/hwconf and find the entry for your wireless card.  You can speed this up by searching for the device name of your card, wlan0 in my case, or entries that have the class NETWORK. The entry you want will look something like this:
    1
    2
    3
    4
    5
    6
    7
    8
    9
    10
    11
    12
    13
    14
    15
    16
    
    class: NETWORK
    bus: PCI
    detached: 0
    device: wlan0
    driver: iwl3945
    desc: "Intel Corporation PRO/Wireless 3945ABG [Golan] Network Connection"
    network.hwaddr: xx:xx:xx:xx:xx:xx
    vendorId: 8086
    deviceId: 4222
    subVendorId: 103c
    subDeviceId: 135b
    pciType: 1
    pcidom:    0
    pcibus:  2
    pcidev:  0
    pcifn:  0
  2. In your wireless card’s entry, locate the name of the driver used.  In my case it was iwl3945.
    1
    
    driver: iwl3945
  3. Goto http://wiki.centos.org/HowTos/Laptops/Wireless and follow the instructions for your particular wireless driver.  In most cases this involves setting up RPMForge for yum, using yum to install driver firmware, then enabling the driver module.
  4. (OPTIONAL) Disable your network and wpa_supplicant services and enable the NetworkManager.
    1
    2
    3
    4
    5
    6
    
    [root@localhost ~]# chkconfig network off
    [root@localhost ~]# service network stop
    [root@localhost ~]# chkconfig wpa_supplicant off
    [root@localhost ~]# service wpa_supplicant stop
    [root@localhost ~]# chkconfig NetworkManager on
    [root@localhost ~]# service NetworkManager start

And there you have it, wireless connectivity on your Centos 5 desktop. Not exactly a breeze, but it’s not rocket science either once you know the steps involved. Why do I have a feeling this will soon become a series or articles related to things that should be easy but aren’t on desktop Centos?

Away3D Drunk Simulator

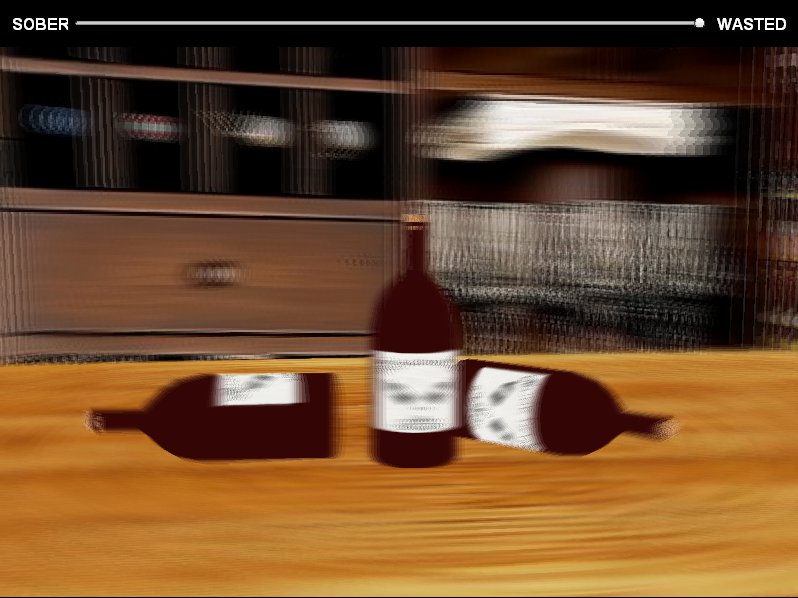
Click here or the image above for the demo. → View the source code.

I decided to have a little more fun with the motion blur technique that I posted about earlier this week. Rather than blur individual objects in the scene, I blurred the entire scene giving a you a view through beer goggles engineered in Actionscript. And to get in the mood I poured myself a glass of Single Barrel Jack Daniel’s. OK, probably wasn’t necessary, but Jack Daniel’s is like bacon: it makes everything better.

Be sure to play with the slider at the top of the demo. Moving it from left to right will gradually increase your level of intoxication, making the motion blur more extreme and longer lasting. This in turn has the effect of making the frame rate really low, but it actually works well in the demo because it also simulates the delayed reflexes of being wasted. At least thats how I plan to explain away occasional single digit FPS.

Having fun haphazardly swaying through my little 3d scene. While this seems like a goofy effect, it probably has some pretty interesting applications in games. It seems like a great way to simulate a “shell shocked” effect in a battle or perhaps blurred vision when moving at extremely fast speeds. Got any other idea?

Away3D Motion Blur

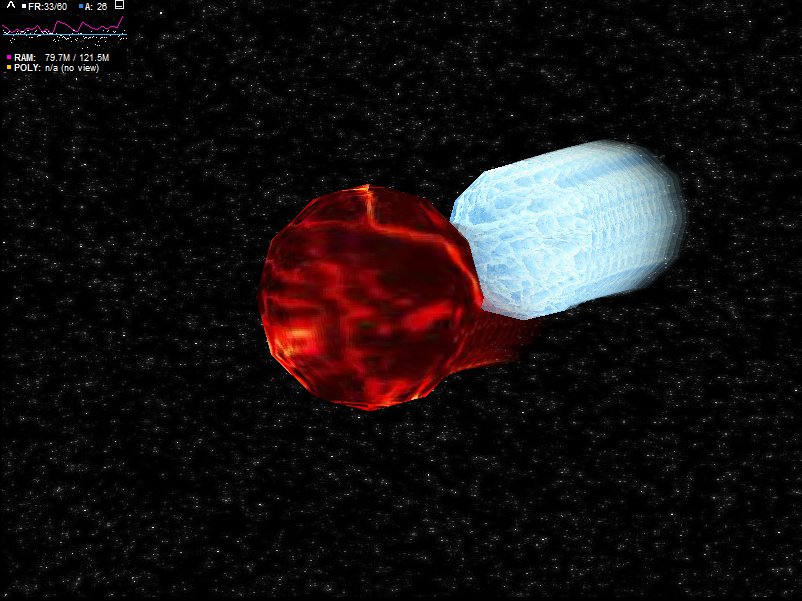
Click here or the image above for the demo. → View the source code.

This was a just for fun idea that popped into my head yesterday. I’m always trying to find programmatic ways to add to the appeal of some of my 3D effects. What better way to jazz up some 3D objects than to view them as though you’re wasted?!

I’ve got a lot of irons in the fire lately, so this one was quick and dirty.  Basically I create an extra View3D in which to render the “blurred” objects.  I take a snapshot of this view (50 in fact), overlay it on a separate background View3D, and use TweenLite to gradually fade the opacity of each snapshot.

In the end you get this pretty neat motion blur effect on your 3D objects. There’s a lot more that could be added to this to spice it up. If I had more time to devote to it I would add a BlurFilter toggle, which makes the motion blur look better but affects performance. Other settings you could vary to alter the effect are:

  • The speed of the objects
  • The number of snapshots taken
  • How fast the snapshots fade
  • The scale of the fading snapshots

and I’m sure there’s more.  Try it out.  You could give your scenes a truly inebriated look by using only one View3D.  By doing this you’ll motion blur the entire viewable scene.  Maybe I’ll strap on some Away3D beer goggles in the future and give that a shot!  Let me know if you beat me to it.

Away3D Morphing with HeightMapModifier

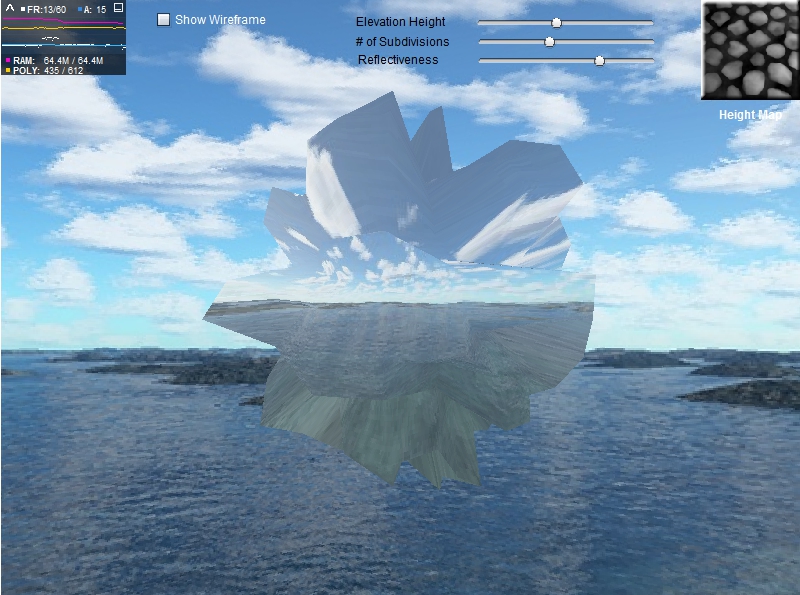
Click here or the image above for the demo. → View the source code.

As usual, shortly after finishing an Away3D demo an Away3d dev (this time Fabrice Closier) suggests a better way to do it. In my previous 2 demos I created fluid and morphing effects on planar meshes using a modified version of the SkinExtrude class.

As per Fabrice’s suggestion, this time I did the same using the HeightMapModifier class. No modifications to Away3D source code necessary and it works on any mesh, planar or otherwise. In this example I apply dynamic height maps to a sphere to create some pretty wild meshes. Be sure to toggle to wireframe mode so that you can get a good look at how the vertices move with each height map transition. Here’s a snippet of how it works:

1
2
3
4
5
6
7
8
9
10
11
12
13
14
[Embed("heightmap.jpg")] private var hmImage:Class;

var heightData:BitmapData = Cast.bitmap(hmImage);
var sphere:Sphere = new Sphere();
var heightMapModifier:HeightMapModifier = new HeightMapModifier(sphere, heightData);

// offset determines the minimum height value of each vertice
heightMapModifier.offset = 300;

// scale is the multiplier for the calculated height values
heightMapModifier.scale = ELEVATION_HEIGHT;

// execute the modifier
heightMapModifier.execute();

One other cool note to remember is that you can also use negative values for scale. By doing so you can create indents rather than bumps on your mesh. See what happens when you turn the “Elevation height” all the way down on this demo.

Also in the example I utilize the EnviroBitmapMaterial to give our target mesh a shiny, reflective appearance. True reflection is very processor intensive and is outside the realm of feasibility right now for 3D Flash. But by using environment materials, we can “fake” a reflective surface by using an environment map that closely matches the Away3D scene. In this case the environment map I used for the EnviroBitmapMaterial is one of the images I used to create the skybox for the scene. You’ll notice the reflective effect even more as the mesh morphs or when you orbit around it.

There you have it, mesh morphing and reflective materials in Away3D. With a little luck, this’ll be the last time you have to hear me talk about it for a while!

Away3D Mesh Morphing

Click here or the image above for the demo. → View the source code.

As I have a way of doing, I immediately started working on a better demo upon finishing the last one on height maps in Away3D. In this demo I use simple bitmap transitioning and my modified Away3D SkinExtrude class (SavageLookSkinExtrude) to create a morphing effect. Basically one mesh’s vertices will smoothly transition to the position of the next mesh’s vertices based on the given height maps.

I mentioned Exey Panteleev’s fluid simulation in PaperVision3D and Away3D in my last post as a method superior to dynamic height maps for creating a flowing, fluid mesh in Away3D. I still stand by the point. But as shown in this demo, dynamic height maps offer many more possibilities as provided by the control you have over the 2D height maps. In fact, you can have a designer, with no knowledge of Away3D of 3D math, create your height maps and you can handle the morphing.

The shapes you can morph are only limited by your imagination… OK, that’s not entirely true. The shapes will be limited by your ability to create, or find, height maps that suit your needs. Also, with this method you are limited to morphing the plane that is the base of the SkinExtrude, or in this case the SavageLookSkinExtrude. Morphing other 3D meshes or primitives is beyond the scope of this technique, and to be honest, beyond my expertise at this point in time.

Even with those limitations, though, this method offers some really eye catching dimension to the toolkit of a hopelessly code driven 3D artist like myself. Play around with it and let me know if you come up with something cool. I’d love to see this method work with some more interesting height maps, like facial maps.

NOTE: I’m currently inquiring on the Away3D Dev list how to get the subdivision size of the SkinExtrude smaller so that I can get more accuracy and precision. Unfortunately as it stands triangles start to disappear when the subdivision size goes lower than 20. I’ll update this post if we come up with a solution. Please let me know if you come up with one yourself.

Dynamic Heightmaps in Away3D

→ Click the image above for the demo (or click here). → View the source code.

While there might be other simpler ways to do it (AS3Mod comes to mind), I found myself working with the Elevation and SkinExtrude classes in Away3D and created some cool flowing effects.  The basic idea is that you dynamically create a gradient bitmap in AS3, tween its appearance on each frame, and use that bitmap as a heightmap for a SkinExtrude.  This will give you the effects shown in the demo above.

I had to make a few slight changes to the existing SkinExtrude class in order to make it more efficient to reuse in each frame.  This is the SavageLookSkinExtrude class found in the source code.  It is identical to the SkinExtrude class found in away3d.extrusions, except for the annotated sections that allow me to generate the heightmap extrusion more than once per instantiation.

The inspiration for this demo came from 2 places. The first is Exey Panteleev’s (much better) fluid simulation. The code displayed on his page is for PaperVision3D, but there’s a link for the Away3D code as well. All things being equal, you should be following the footsteps of Exey since his solution performs much better than mine.   I just did this demo cause frankly I’m not that good at 3D math and I could barely understand the math involved in his solution. The only real advantage of my method is that you have more control over the pattern as it is driven by the bitmap.

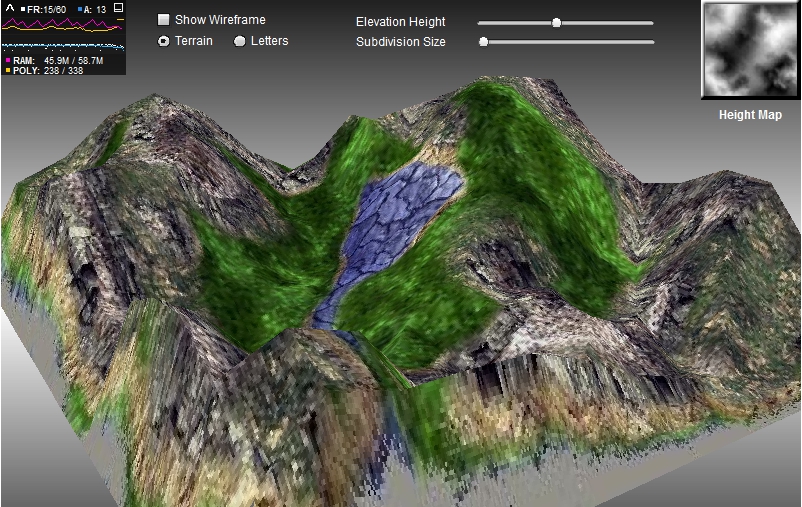
My other source of inspiration, as well as pure tutelage with Away3D height maps and SkinExtrude, is Jason Bejot’s “Create Terrain in Away3D” tutorial. Jason gives a very easy to follow and concise look at how you can use Away3D’s Elevation and SkinExtrude classes in conjunction with grayscale height maps to create realistic terrain. I basically just took his method and put it in motion.

As you can see, there’s more than one way to skin this cat.  Play around with it and see what kind of creations you can make with heightmaps and SkinExtrude.  I don’t have the time to play with it now, but I feel like bitmaps given the PixelBender treatment might create some pretty wild 3D objects.